I've not been very active for the last half of the year, I've been busy with university commitments in the evenings and work during the day means one does not get much free time to do fun stuff like diving!
Despite all this, I wish everyone a very Merry Christmas and all the best for a fantastic 2015!
DiveSigns
Thursday, 25 December 2014
Sunday, 10 August 2014
Equipment Review : Spring Straps
Introduction
In my opinion, if there is a single piece of equipment that makes kitting up easier then spring straps have to be either at the top of, or near the top of the list. A brilliantly helpful buddy is also there too. Some people just seem to have a better capacity and are able to sort themselves out AND assist others at the same time.I am going to discuss two slightly different spring straps as part of this review. My point with this review is to review spring straps as an object as opposed to a brand specific review, but you will also be getting that as a spin off (but like I said its not the primary focus to compare and contrast).
Spring What?
Spring straps, they are simply straps (for your fins) that are made of springs. And that is it - they are simple and fuss free. To explain better, I think its better to show the "competition":Rubber Fin Straps
The fundamental part of the traditional fin strap is the rubber fin strap itself. A typical one is shown below: |
| Traditional rubber fin strap |
Plastic is also made from hydrocarbon polymers however, these tend to be shorter and more of a network. This means that while the individual bonds are still able to stretch in the same way as rubber, the overall magnitude of the stretch is less. This on its own isn't a massive issue : a slightly less stretchy material isn't too problematic.
The issue is that plastics become brittle with decreasing temperature. Whilst you are hardly diving in liquid helium at nearly Absolute Zero, British and Northern divers WILL be diving in water easily approaching 2-3oC. At these temperatures, hydrocarbon polymers because less elastic. In the short term this simply means less stretchy. The other issue is that it reduces the force required to cause plastic (i.e. permanent) deformation. So what does THIS mean? It means that with time the plastic strap will become significantly more fatigued and more likely to fail, i.e. snap. And when will it do it? At the point it is under the most loading i.e. when you are trying to stretch it over your feet just as you are about to jump in.
Buckles
Plastic buckles suffer from the same materialistic issues as the straps explained above, but I don't think that this actually their biggest problem. The buckles have been designed with the assumption that all divers are in the Maldives.What I mean by this is that they are very fiddly, using them whilst wearing gloves is hard work, and when your hands are cold and wet I find that the buckles are actually painful to use.
I see many divers struggling with the strap and buckle system, most struggle in different ways, but its still a struggle to get that little fiddly bit of plastic slotted in the socket and pull the strap tight.
 |
| Plastic buckles |

And the alternatives?
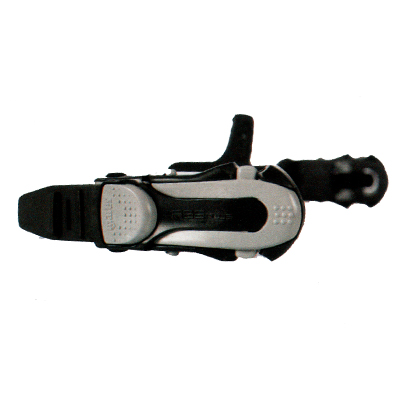
Having looked at traditional "rubber" straps and their buckles, I personally am of the view that they are not a great choice, so what's our alternative? Well permanently riding a scooter is an option, certainly one I'd love, but the Bank of Santander says no.| Simple spring strap (from www.oms-russia.ru) |
 |
| Buckled spring straps (from bluewatersports.com) |
The XS Scuba ones that I recommend (for Jet Fins and Jet Fin variants like Turtle fins, Hollis F1 etc) attach by going through the mounting point of the old rubber fins. So these are not going anywhere once attached. Although I do also have the "generic fin straps" that I've provided a link for below on one pair of fins (my "summer non-drysuit fins")
Whilst research the XS Scuba straps, I also found that they now come with both types of connection (the pins and the studs).
Sources
- Generic Fin Straps - Underwater World - £15.73
- XS Scuba Spring Straps - DIR Direct - £47
Conclusion
A good quality of spring straps will make donning and doffing fins a much easier activity and more comfortable on the fingers. Snapped straps at the last second will cause no more stress as they will be resigned to the history music alongside the diving helmet.Sunday, 27 July 2014
Attaching boltsnaps
Background
A wide range of your gear will need bolt snaps being attached : your primary regulator, your SPG, your primary light and so on.This article will take you through the technique of securely attaching bolt snaps to your gear easily and reliably. I always struggled understanding how to attach bolt-snaps because, being dyslexic, I do struggle to understand and learn by reading (in particular), but also listening too. I much prefer to do and be shown, so I could never do bolt snaps until someone showed me this technique.
Getting started
To attach a bolt snap to a piece of equipment you will need the following :- A bolt snap
- Your equipment
- A piece of cave line approximately 20 cm long
- A lighter
In this example, I want to attach a bolt snap to one of my stage bottle regulators as you can see below.
 |
| Regulator and boltsnap |
The first step is to wrap the cave line around your hose and through the bolt snap three times as shown below.
 |
| Three wraps around the hose and bolt snap |
You want to pull both ends of the line tight to bring the bolt snap tightly against the regulator hose. Then make a reef knot as shown below. Pull the reef knot tightly to secure it and pass the two ends of the line backwards. You will probably have to pull the lines tight to get them under the boltsnap. The tighter you can do all of these steps the better secured the bolt snap will be.
 |
| Passing the lines backwards |
Flip the hose over so that you are now looking at the back of the bolt snap. Pull the lines tight and make another reef knot on this side of the bolt snap as shown below.
 |
| First reef knot on the back. |
 |
| Second reef knot on the back. |
 |
| Neat bolt snap |
And that's it. One bolt snap securely attached to your hose. I hope this has been of use, if you think I can make the explanation better or need additional pictures let me know and I'll update this guide.
Sunday, 1 June 2014
Blogs Updated : Additional Video
Friday, 2 May 2014
DVD Review and Summary : DIR 2004
DIR 2004 DVD Review
About the DVD (from the manufacturer)
"The most comprehensive overview of the "Doing It Right" system ever available on video.When Jarrod Jablonski and George Irvine set out to develop a replacement for the very-popular (but somewhat dated) DIR video series, their goal was to provide a complete head-to-toe presentation of how they configure their own dive gear to conform to the DIR standard. By the time they finished filming, the project had grown in scope to cover not only essential DIR concepts like team procedures and dive planning, but advanced topics like gas mixing and Gavin Scooter maintenance.
Encouraged by their results in covering the DIR basics, George and Jarrod then sat down to an extensive series of interviews that provide a fascinating history of the development of DIR diving within the Woodville Karst Plain Project and the logistics of exploring Wakulla's deep cave system at the extremes of dive technology and practices. To cap the project off, George and Jarrod narrate a complete dive within the Wakulla cave system. It's the first time that anyone outside the team has been able to listen in as the WKPP's lead explorers review the results of a project dive.
DIR 2004 is essential viewing for anyone interested in applying DIR concepts to their diving. It can be seen as a supplement to the successful DIR Fundamentals book or to a DIR Fundamentals class, but it also stands alone as a document of the evolution of safe diving practises at the cutting edge of underwater exploration."
Pricing and Purchase Locations
- US - Global Underwater Explorers - $44.95
Packaging
First impressions are promising : the DVD collection is in a normal DVD case with a nice cover, on the front a nice diving scene, on the back is the DVD contents (detailed and summarised below). Inside the three DVDs are secured firmly to the casing.Disc 1 Summary
The first disc is aimed purely at the equipment you carry as part of your rig and starts from a blank twinset right up to a fully equipped rig. There are the following chapters on this DVD:- Introduction - 9 minutes
- Tanks - 11 minutes
- Wings - 10 minutes
- Backplate & Harness - 17 minutes
- Fitting a backplate - 21 minutes
- Lights - 31 minutes
- Regulators and hoses - 27 minutes
- Balanced rig - 10 minutes
 |
| DVD #1 - Main Menu (from DIR 2004 DVD) |
Introduction - Summary
In the introductory section Jarrod Jablonski (JJ) and George Irvine the Third (GI3) talk very briefly about the origins of underwater exploration and the emergence of recreational SCUBA diving. GI3 then touches on that whilst diving as any sport has risks, he felt that unnecessary risks were being put into the sport. |
| Introduction - (from DIR 2004 DVD) |
Unfortunately at this point JJ and GI3 highlights that they will talk about the more typical recreational, single tank rig. But at no point in the DVD collection does this happen. GI3 does highlight how the gear used by the technical diver and the gear used by the recreational diver are actually the same.
Tanks - Summary
Moving onto the equipment configuration of a DIR rig, JJ introduces and will use a manifold twinset (doubles) of Aluminium 80 cuft cylinders. While talking about the materials available for pressurised SCUBA tanks, JJ highlights the concept of a balanced rig. GI3 explains the basic principle of the operation, what a manifold is, and the reason why a manifold is used, as well as the basic process of manifolding two tanks. Although I must admit, his way of building a manifold twinset sounds far more complicated and awkward than I've used!GI3 continues to explain another feature of the manifold : it shouldn't be a solid structure it should have some flex in case of hitting objects during cave or wreck penetrations as an example. GI3s explanation of the manifold is a bit jumpy in that he went from talking about the burst discs to then why we have an isolator manifold. JJ then does step in to explain about the operation and gas glow when using a manifold.
GI3 then returns to the conversation to resume talking about the twinset building process. An important point he does raise is that the top band needs to be at the break of the neck of the tanks, i.e. the highest point. Continuing his explanation of the twinset, he explains that soft rubber knobs are ideal, again to prevent damage to your life support system.
 |
| Manifolds (from DIR 2004 DVD) |
Buoyancy Compensator - Summary
In this section, JJ and GI3 together fit a Buoyancy Compensator (BC) to the twinset. At this point I think they let themselves down as they are both required to do it - a bit of planning and scripting would have meant that one could have talked while the other attached the BC. JJ and GI3 are using a Halcyon Explorer 40 wing. A horse-shoe shaped wing.GI3 explains that historically the WKPP had a lot of trouble finding equipment that suited their needs, shape, material, inflator location were never right. JJ explains that the wing being demonstrated is made from a Ballistic Nylon exterior for protection of the bladder which is made of cordura inside.
 |
| Buoyancy Compensator (from DIR 2004 DVD) |
GI3 explains the wing vs jacket-style BC. The traditional jacket style BC causes the upper body to be compressed and adds bulk, the ideal system is smooth and hydrodynamic. The design of the wing also means it will put forward the least profile in the water keeping drag to a minimum. JJ explains how the wing style also helps the diver to achieve a horizontal profile in the water, whereas the jacket style BC causes the diver to be more heads-up/feet down in the water which causes drag but also risks coral and silt disturbance
Backplate and Harness- Summary
Demonstrating with a simple aluminium backplate and harness, GI3 shows how clean and simple the system is for the diver. With the jacket style BC, the inflation bladder is on the front of the diver, with the wing system this has been moved to the back and what remains is a very clean, clutter free harness for the diver.GI3 continues to explain that the backplate bolts securely to the twinset. He also continues to demonstrate how clean the rig is, he talks about how bulky a "tech BC" would be - it would be good to see it in comparison.

JJ also recommends that divers use the kidney dump as opposed to the corrugated hose because this keeps the diver in the horizontal position. Finally JJ points out the minimalist approach with the rig, particularly pointing out that there are only a few D-rings on the rig.
GI3 states how the crotch strap is extremely important because initially it keeps the rig down on your back, but also in a DPV dive, the crotch strap is used as the towing point which makes it a structural part of the rig. GI3 also explains that without the crotch strap your waistband will ride up your body. I can personally attest to this, on my first holiday to Malta, my crotch strap came apart and I dove the rest of the holiday without it - it did make some things more difficult.
JJ concludes by summarising some key points of the rig, webbing should be semi-stiff so that it resists wear. A knife is also worn on waist band too. Rubber o-rings, or snoopy-loops are also stored on the harness under the chest d-rings for the storage of back up lights.
Fittting a Harness and Backplate - Summary
JJ explains how the strength of the harness and backplate system is the almost infinite adjustable and the clean rig for the diver. The first thing the diver should look for is the waist passing through the crotch strap loop. The option is there if you want to use the main buckle to retain your canister light. But generally a second buckle to retain the light is the preferred. That way if you de-kit in water, you won't lose your light - something GI3 and JJ forgot to highlight. The buckle will be on the left waist strap to conform with the left hand release.GI3 explains that another benefit is that you could use the same harness in combination with a single tank adaptor so that you can dive a single tank system instead.
JJ starts explaining about d-ring location and how its a balance for high for stage bottles, but low enough to be in line with the armpit approximately. Regarding the fit, there should be enough room to get out comfortably, but snug enough to prevent equipment rolling about on your back.
GI3 explains how the crotch strap is used as a tow point for towing a diver, but also you can have some space for helping you if you are struggling to reach your valves to push up the cylinder. At this point JJ explains how he would use a second buckle for retaining the light, but by having the primary buckle go right around it means that you can still retain your light if you forgot that buckle.
The harness should be set up in the thickest undergarments you will be wearing. Ideally fitting this in your drysuit.
JJ moves on to explaining about the crotch strap, the front d-ring (the ring at the bottom as it hangs down) is used for towing and shouldn't be used for carrying gear as it will hang straight down. The rear d-ring can be used for clipping reels to. The location of the d-ring is described.
 |
| Setting up the crotch strap (from DIR 2004 DVD) |
JJ challenges the view that quick release buckles are not necessary and that the difficulty of getting out compared to the jacket style BC is a misconception. GI3 does re-iterate his view that quick release are a potential hazard.
GI3 and JJ start to explain the process of webbing a harness : starting from the back and then making the straps.
Lights - Summary
JJ explains that divers very often think of lights as an illumination tool, the DIR system uses the light as a communication means which helps keep a team together. JJ shows a primary (canister) light and a backup light. Batteries for a canister light would be rechargeable whereas disposable batteries are the preferred choice for back up lights.GI3 explains about the history of off gassing batteries and the rationale behind the surface sealing o-ring. GI3 explains that a key feature of of the light is that there is a switch guard to protect the switch from accidental switching. JJ shows a few of the key signals that can be made using the light.
GI3 continues to explain that the light has been an invaluable communication tool, ironically in clear water. He then goes on to show the mounting position of the light and how it adds zero drag because of the position under the arm. The clip for the light head is shown and usage explained. GI3 also reminisces about his first cave dive.
JJ explains how the Goodman's handle is used to allow the diver to continue to use his hand. JJ then explains why he thinks the head mounting of lights is a bad idea.
 |
| Back up and primary lights (from DIR 2004 DVD). |
Regulators and Hoses - Summary
In this section, GI3 explains the configuration of the hoses and regulators between the two first stages. He starts by explaining that the starting point is the back-up regulator. He recommends a slight mentality change - the regulator is a backup (to compliment the primary) as opposed to an octopus. The backup regulator is hung around the neck on a piece of bungee. This means that you always know where it will be and not need to search for it.While GI3 is sorting out the hose routing so that the back up regulator goes under the corrugated hose, JJ explains that he is demonstrating the routing based on a non-swivel regulator and hints that he will explain other types - but never does.
Going back to the regulator, GI3 explains that you want a simple 2nd stage because you will want to be able to disassemble the regulator underwater. The backup regulator is de-tuned to keep the performance low to prevent free flows. A back up that can be de-tuned is desirable. The wing goes behind the hoses.
 |
| Hose routing of the left post (from DIR 2004 DVD) |
Moving to the right post, GI3 explains that the hoses go behind the wing. The wing inflator hose is on the right post too and goes through the bungee loops on the wing inflater hose. He then demonstrates the correct routing of the long hose and explains why the right post is the only choice for the long hose. He then also demonstrates the long hose deployment technique.
JJ explains the options for drysuit inflation depending upon your dive, GI3 explains the mounting and mounting choices.
Balanced Rig - Summary
GI3 explains that the balanced rig is a fundamental part of the DIR system. He tries to explain that the mentality of using a BC as back up buoyancy isn't how it is intended, it is intended for fine tuning. He explains that the process of working out your weighting requirements is to get in the water with just a small amount of gas so that you can breathe, but effectively empty tanks and empty wing and minimal gas in the drysuit. This gives you one extreme of your weighting - the worst case scenario that you are low/lost your gas - you want to be able to stay at 6m to do any deco/safety stops.The other end of the extreme is that at the start of the dive when you have a full twinset you can still get up - this may involve dropping lead however - hence why you need a distribution of weight and not all in the form of v-weights for instance. The explains that the difference in weight from the former situation will be purely the weight of the gas.
You will need enough removable weight so that you reduce your negative buoyancy to no more than what you could potentially swim up against. A diver needs to remember that they can use their equipment such as lights as part of their weighting system.
 |
| Balanced Rig (from DIR 2004 DVD) |
Disc 2 Summary
The first disc is aimed at the fundamental / core equipment that you need as a diver. Disc 2 on the other hand covers the secondary / additional equipment you may need such as stage / deco bottles, scooters, drysuits etc.There are the following chapters on this DVD:
- Exposure equipment - 10 minutes
- Additional equipment - 9 minutes
- Stage bottles - 26 minutes
- Gas mixing - 16 minutes
- Procedures - 55 minutes
- Gavin Scooter - 38 minutes
Exposure Equipment
GI3 explains about exposure suits (wetsuits and drysuits) whilst in his garage. He explains how wetsuits are ideal for warm, shallow diving, but the problem with thick wetsuits is the compression of the suit. I personally have seen this. Whilst in Malta in February I was diving in a 7mm wetsuit. I remember tying on my depth gauge to my wrist as tightly as I could whilst kitting up in the van. Upon jumping in the water and descending just a few meters the suit had compressed massively and was at risk of having the gauge slide off my arm. |
| Exposure suits (from DIR 2004 DVD) |
GI3 explains that the key features of a drysuit are self-donning ie. front entry and the zip must have a zip guard. The inflater should be a swivel. The exhaust valve should be on the arm. Pockets should be on the side of the legs and not on the front so as not to cause extract drag.
Finally GI3 explains that he has a custom fit suit as this helps the suit fit well and avoid excessive bagginess. He shows how his feet and legs are also as snug as possible. A telescopic torso helps with flexibility.
Additional Equipment
GI3 explains that a computer isn't used - a depth gauge and bottom timer is used and placed on the right wrist this is because if you move into DPV diving, the display will always be there and easily visible and illuminateable by your light in your left hand, a compass is on the left wrist.
Computers are not condoned because they believe that the computers never generate accurate decompression.
The Scuba Pro Jet Fin is the typical and recommended fin because it gives you good thrust. When you move into multi-equipment diving you need a stiff fin to put the power into the water. Heavy fins are also helpful to keep drysuit feet down. JJ explains how split fins are very difficult to use and make some techniques very difficult, almost impossible. GI3 explains how spring straps are used to prevent breakage.
Masks need to be very comfortable and of low-volume to make it easy to clear. Slap straps, stretchy straps also keep it close to your head to prevent catching on debris in the water.
The head dissipates massive amounts of heat so a good quality hood helps a diver to keep warm and stay comfortable.
Stage Bottles
GI3 starts by explaining that only MOD is written on the bottle. Luxfer aluminium 80 cuft cylinders are recommended because of the buoyancy swing from full to empty. The goal is to have a neutral cylinder as this makes diving with them easier.DIN valves are used on stages and this minimises risk of losing o-rings. In the same way as the twinset valves, the stage valves need to be rubber and of good quality - an easy turning valve, this allows you to feather a valve in a case of emergency.
 |
| Stage bottles (from DIR 2004 DVD) |
JJ also confirms that minimal stickers are to be on the bottle, the only information you need to know on a bottle is that its safe to breathe at depth. Nitrox labelling is useless. He continues to explain about the rigging kit and how it affects bottle positioning in the water.
GI3 explains how rubber bands are used for stowing the regulator hose against the tank. JJ then explains about regulators and the hose routing. A short piece of cave line in a loop is used to keep the SPG on the short hose stowed neatly. A bolt snap on the stage reg is used as it means that you can clip the stage to the bottle for quick stowing if needed.
JJ and GI3 do explain about procedures for stowing the regulator and the hose and some issues that can arise.
Gas mixing
Returning to GI3s garage to explain the very loose procedure for gas blending. GI3 explains how gas blending is critical part to gas diving because breathing the wrong gas could be fatal. GI3 starts by showing how two pieces of tape are used to summarise the blend records.GI3 is blending a gas and is adding 80 psi of oxygen. Once happy that the correct amount of oxygen has been added. The tank is turned off, but the whip is still left attached. On the first piece of tape, the amount of oxygen that has been added and the date is recorded.
He explains a good practise when using a cascade blending system is to keep a running tally of the pressure inside a tank. The helium is now added to the mix. The helium added is then also added to the first piece of tape.
 |
| Gas blending (from DIR 2004 DVD) |
He finishes by explaining how the bottle and the mix is handled after the dive.
Procedures
GI3 and JJ are on the sofa talking about emergency procedures. The discussion starts by talking about the team approach to diving. GI3 is quick to encourage that any macho "I can take care of myself attitude" needs to be dismissed. When a team member has a problem, that person should become the focus of the team. |
| Procedure discussion (from DIR 2004 DVD) |
GI3 and JJ are firm believers of aggressive problem solving. The discussion tends to based in the cave environment, but GI3 explains issues appearing in cave and open water diving.
JJ explains how the team would be behaving and responding if diving in a team of three and one diver lost their gas. GI3 gives a situation of a cave or wreck dive where you lose your primary light. They then use an example of team work about losing the line in a cave. JJ also discusses the situation of a gas failure and light failure and how the team would behave. GI3 also continues to explain how stages are used.
The two continue to talk about different scenarios and experiences that they have had.
Gavin Scooter
Returning to GI3 and his garage to talk about the scooters used. Starting by discussing the battery packs and particularly talking about the long-range scooter dive scooters. GI3 emphasises the importance of knowing the battery condition by using a burn tester. The burn tester is an array of resistors that mimic the load of the motor that the battery would see and then record the time taken for the battery to drop from 24v to 20v.Post dive maintenance involves opening the lid to inspect the motor. There are three primary components to the scooter, so its very easy to fault find any problems. GI3 recommends measuring the current draw of the motor occasionally.
 |
| The Gavin Scooter (from DIR 2004 DVD) |
The Gavin Scooter section actually has several sub-sections in it. The next section discusses the motor in detail and the sub-assemblies. GI3 explains the difference between the motor in the Gavin and Aquazepp. The next section covers the clutch assembly. GI3 is showing the clutch assembly, unfortunately he is spending a lot of time looking down working with components in his hands. He then shows you assembling the clutch and propellers and assembles the back end of the scooter. He talks about how you should manage the pitch of the propeller to manage speed.
The next section discusses a vacuum test to find leaks.
The next section discusses about finding a reed switch failure and he explains that you can quickly trace the fault as the sub assemblies are extremely simple. He shows this by quickly changing out the motor.
The next section is about the trigger wheel. The trigger wheel is there because if the trigger cable breaks you can hold the wheel to drive the scooter. GI3 then goes on to strip down the prop assembly.
Disc 3 Summary
The final disc covers the history and founding of GUE and some of the exploration sites and techniques used.There are the following chapters on this DVD:
- Getting started - 27 minutes
- Diving & DIR - 54 minutes
- Planning extreme dives - 50 minutes
- Decompression - 52 minutes
How did you get started into diving?
GI3 and JJ start having an extremely informal chat about their first introduction and experiences into SCUBA diving. |
| GI3 and JJ talk about their introduction to SCUBA diving (from DIR 2004 DVD). |
GI3 talks about the start of the WKPP and how when the team were asked to support a wreck diving course, they reviewed the equipment set up to make it universal.
Diving and DIR
Initially GI3 and JJ are asked if DIR is all about an equipment configuration. GI3 goes into the detail of describing it. JJ talks about how DIR is a difficult diving technique and receives a lot of grief, mostly directed at the equipment. GI3 supports this and says how his experience has always been pro-DIR dive systems. GI3 and JJ are both supporters of the idea that people need to prepare themselves for diving i.e. keeping fit. |
| DIR Diving (from DIR 2004 DVD). |
When asked about GUE and DIR GI3 and JJ both support both ventures. And the biggest challenge that faces the diving industry is the mis-information that is available. GI3 goes on to explain why he gets so angry with people on the Internet. He actually believes that there are people intentionally misdirecting people. JJ even defends that GI3 has been an overall positive influence.
JJ and GI3 continue to talk about the issues they have found with the dive industry, dive industry attitudes etc.
Moving on the discussion changes to what it takes to get into big cave diving and how it appeals to them.
Planning a big dive
GI3 explains how historically they used to log how much equipment, time and gas they had at any one point. But they now take the view of what do they need when at the end of the line. JJ explains that they use a team approach to support the diving.GI3 and JJ laugh about how when they reach the end of the line and they chuckle to themselves. Hitting the end of the line, JJ is usually the one to lay the line whilst GI3 performs the survey and at the same time they are using the Minimi scooter-camera combination.
When asked about how far they think they can go, JJ believes there isn't really a limit. GI3 says that he thinks that the equipment is no longer a factor.
When discussing the scooters, GI3 discusses all the key elements and explains how he believes its all balanced out perfectly. Talking about carrying all the gear, they explain about how they achieve it.
When talking about dangers and risk, GI3 explains that the decompression is the most dangerous part of the dive. JJ explains about his view of using elevated levels of oxygen in terms of both the bottom gas and the deco in some parts.
GI3 talks about his opinion of decompression. He explains how the current decompression models are flawed. He explains about how they re-shaped the deco shape to get better decompression. JJ even mentions that you can force bubbling in your body to accelerate decompression - although he doesn't condone it. They do some quick comparisons between the deco that traditional algorithms propose versus what they actually do.
Is Decompression an exact science?
JJ explains that there is a desire that decompression can be modelled for all divers but he believes it won't happen. He introduces some of the things that they did such as removing the usage of air. GI3 gives an example of diving at Indian springs and looking back they see how their performance was reduced because of the narcosis.GI3 explains how he thinks there isn't an awareness of PFOs. And how they had to change the mentality of the attitude to deco i.e. re-shaping the deco curve based on the experiences they were seeing.
When asked about using helium in shallower depths, GI3 explained how JJ was running the alternative mix while GI3 was running the traditional mixes.
When asked about 100+ foot air dives GI3 believes that it comes down to educating divers about the real physiologic impacts. JJ supports this by explaining about how a person would be compromised and also dismisses the view that people can learn to manage narcosis.
When asked about if GI3 is being irresponsible pushing their decompression beliefs. GI3 believes he is trying to challenge the mis-information, and he believes that the decompression theory they use will "hold water" and can't be defeated easily. The other half of his explanation comes down to the fitness of the diver as well. GI3 also believes that the decompression algorithms out there at the moment actually have very little solid evidence.
Woodville Karst Plain Project
A short 17 minute video, narrated by JJ and GI3 discussing the WKPP. During the commentary maps show the area and the cave survey. Eventually the video shows the cave passages and highlight how that could connect to the Leon Sinks cave system. JJ and GI3 explain how the core goal is to help protect the environment from the urban sprawl.Some of the equipment such as the scooters, rebreathers and vast number of stages required is shown. They talk about the decompression and how they stage food and drink.
Overall Summary
The DVD is presented in a very relaxed format, some of the discussions are done on a sofa and are very casual with some light hearted jokes in there too. Unfortunately video production does let it down. Whilst there is no need for overly elaborate video production, the poor audio is apparent at times with several "standing-in-front-of-the-mic" situations, and especially when things go outside into a garage.This DVD has taken a significant amount of grief, (http://www.scubaboard.com/forums/archive/index.php/t-107088.html) and I think most of it is undeserved, but I can see how some of it has been earned. As a DIR diver of about 5 years, I can now really listen in to what GI3 (in particular is saying) and I can filter out the "strokes" statements, but it is because I have this experience and knowledge which means I can hear the truth in it. Giving this DVD to someone who is a diver with 50 dives to their name, won't be able to pick out the true gems of knowledge, this is what lets the DVD down I think, so if a new DVD was produced it would have to be ultra-carefully scripted to make the key points more obvious and not hidden by personalities.
The DVD is actually aimed at DIR-aware and pro-DIR divers, whereas I think they actually wanted it to be a DVD that any diver could watch. Unfortunately it took a lot of interrupts by JJ to do some background explaining (particularly with respect to the equipment). If a new version was made, I think they should have a typical diver configuration can show the trade-offs and presented in such a way that means you don't need to be experienced to truly understand it.
Personally, I think the DVD collection is brilliant and is an easy introduction into DIR and I would recommend it, what I would say is that it does pique your interest, and gives you enough information about DIR to make you want to know more (and sign up for a course).
Tuesday, 22 April 2014
Course Review : PADI Divemaster (Part 1)
About the Course (from the PADI Website)
During the PADI Divemaster program, you learn dive leadership skills through both classroom and independent study. You complete water skills and stamina exercises, as well as training exercises that stretch your ability to organize and solve problems as well as help others improve their scuba. You put this knowledge into action through a structured internship or series of practical training exercises.As you progress through your Divemaster course, you’ll expand your diving knowledge, hone you skills and increase your confidence. Then, as a PADI Divemaster, you’ll use these attributes to lead, mentor and motivate other divers and experience the joy of seeing them transformed by the majesty of the the acquatic realm.
After becoming certified as a PADI Divemaster you will be authorized to:
- Supervise both training and non-training-related activities by planning, organizing and directing dives
- Assist a PADI Instructor during the training sessions for any PADI Diver course
- Conduct the PADI Skin Diver course and PADI Discover Snorkeling program
- Conduct the PADI Discover Local Diving experience
- Conduct the PADI Scuba Review program
- If qualified as a Discover Scuba Diving Leader, independently conduct the PADI Discover Scuba Diving program.
- Earn the PADI Digital Underwater Photographer Specialty Instructor rating to be able to teach the PADI Digital Underwater Photographer specialty.
- Independently guide Open Water Diver course students on the tour portion of Open Water Diver course Training Dives 2, 3 and 4 at a ratio of two student divers per certified divemaster.
- Accompany Open Water Diver students under the indirect supervision of a PADI Instructor during:
- surface swims to and from the entry/exit point and during navigational exercises
- when the instructor conducts a skill, such as an ascent or descent, a Divemaster can remain with other student divers (with an individual student or buddy team)
- Accompany student divers during Adventure Dives or Specialty training dives under the indirect supervision of a PADI Instructor.
- Conduct the PADI Seal Team Skin Diver Specialist AquaMission
- Conduct subsequent dives under an instructor’s indirect supervision for Discover Scuba Diving participants after participants have satisfactorily completed the first dive with a PADI Instructor.
- Teach Emergency First Response courses after successfully completing an Emergency First Response Instructor course.
About me
At this point, I had worked my way up the PADI ladder from my Open Water course in 2006 to meeting the pre-requisities to be a PADI Master Diver in TBD. With regards to my personality, I have helped out various clubs with try-dives and even just telling friends about SCUBA diving I got a few hooked and so teaching something I love has become part of what I want in my future.Having experienced other "systems", such as British Sub-Aqua Club (BSAC) and the Scottish Sub-Aqua Club (SSA) and mostly been put off by them, it was a very easy choice for me to go the PADI Professional route.
My Dive Centre
I have chosen to start my Divemaster course with Buckland Dive Centre (BDC). At the time I was living in Essex and I had struck up a good relationship with BDC and got on very well with all the staff. I had provided rescue diver support for courses in the past which also gave me a taster to the role of DM.Course Materials
Buying all the materials like the Crew Pack I had bought from a previous, but now defunct, dive center, but all in all is about £120. From reading the DM manual, I actually found myself buying PADI RDP tables, the Wheel, the eDRP etc because I was expected to be familiar with all of these. This did add additional cost, but thankfully very little due to the wonders of eBay.Course Instructor
My Instructor was to be Chris Martin. For me, he was the perfect choice. Chris is very tech diving aware (and is a tech diver himself). I wanted to learn using my familiar harness and wing system and Chris had no problems with this (not something many Instructors share however).The Course
Background Reading and Knowledge Reviews
The PADI learning system involves reading the excellent course manuals. The DM manual has a rather heavy NINE (9) chapters and at the end of each chapter is a Knowledge Review - essentially a short quiz to try and ensure you have grasped the salient points of the chapter. The main points of the chapters and quizzes are :- The role and characteristics of a PADI Divemaster
- Supervising Diving Activities
- Assisting with student divers
- Diving Safety and Risk Management
- Divemaster-Conducted Programs
- Specialised Skills and Activities
- The Business of Diving and Your Career
- Awareness of the dive environment
- Dive Theory
Knowledge Review Reviews
Every Wednesday night would be a training session. We would meet up at the pub which is where the pool was located, and whilst we waited for our slot, we discussed the knowledge review. The first six sections were passed through easily.Pool Sessions
The second part of the Wednesday night training would be practical work. In the practical sessions your skills are tested and score. All of your skills are assessed on a points scale of 1-5 where 1 is very poor and 5 is excellent.In the first session we started the first two stamina tests, out of a total of 5. For the stamina tests, I had to get at least 15 points, that meant 3 points per test on average.
The stamina test one was a grueling 400m swim, or 16 lengths of the pool. For the 400m swim, this meant I had to do it in less than 14 (?) minutes. I managed, but on the last few lengths I was starting to struggle and so Chris swam with me to help keep the pace up and we did it. Much to my relief I scored the average score of 3.
The second test was a 15 minute float. I had been training for this as well by treading water for 15 minutes and I found I could do it, not easily but it was doable. Talking with Chris, I actually found out I could just lay on my back and float! Result! So I got a 5 for that!!
Open Water Session
Whilst at BDC supporting a Wreck Diver speciality, I conducted two more stamina tests. The first was an 800m snorkel swim. This was both difficult and not at the same time. The problem I had was that my fins were quite floaty so they kept slapping the water surface massively reducing the effectiveness of the kick. Frustratingly I was 2 seconds over the time requirement for 3 points, and so only got two for this.The next stamina test I did was a 100m tired diver tow. I did a tank valve tow and absolutely went for it. But I was struck my the two second misfortune again and by two seconds I was over the requirement for 4 points so only got 3. Not too bad. I'm fairly happy. As long as I get a two on the last skill : equipment exchange, then I've passed.
Practical Application
The final set of practical skills that I am working on are the following :- Dive Site Set Up and Management
- Mapping Project
- Dive Breifing
- Search and Recovery Scenario
- Deep Dive Scenario
Conclusion
During 2012, I managed to cover about 40% of the required subject areas. At the end of the year however, I moved to Scotland and so could no longer finish my DM course. I am hoping to continue my training with another Dive Centre in the near future, at which point I'll document that too.Thursday, 27 March 2014
DVD Review : Pantalleria 2005
About the DVD (from the manufacturer)
In May 2005 a team of 10 scuba divers from the Global Underwater Explorers began a project designed to carve out a model of the archaeological site from a detailed survey off point Tracino on the Pantelleria island. Many amporae dated back 200 BC are brought to evidence and for the first time are documented resting on the sea bed at a depth of over 80 meters.Pricing and Purchase Locations
- UK - DirDirect - £18
- US - Extreme Exposure - $17.95
Content Summary
There are the following chapters on this DVD:- Documentary in Italian
- Documentary in English
- Photo Gallery
- Bonus Material
 |
| DVD Menu (from Pantelleria 2005 DVD). |
Core Material - Summary
The DVD starts with a short introduction and history to the island of Pantalleria and the wreck that they will be diving in the Mediterranean. I really liked this short history, some documentaries that I've seen jump straight in without the "history lesson" at just 1.5 minutes long it was light and concise but to the point. |
| Short history on the wreck (from Pantelleria 2005 DVD). |
Skipping forward to the present (2005) day, the narrator explains that the local authorities wanted to explore the wreck and understand the history more , this is where the GUE team came in. Video starts with some gentle rock music showing the dive teams getting prepared, setting up equipment and some fun video of divers on scooters. During this "start-up" phase of the video, I found that the clips were short, just a few seconds each which allowed you to grasp the point of what you were viewing but not truly understand it.
Just as an example, a short clip shows a truck parking up with the dive and mixing cylinders - if it had been a slower clip and also a bit longer, it would have helped the viewer grasp the magnitude of the diving to come:
 |
| Truck load of cylinders (from Pantalleria 2005 DVD). |
 |
| Day 2 : Checkout dive (from Pantalleria 2005 DVD). |
On this DVD, the scenes transition seamlessly from each day of diving to the next. Whilst this makes good for lots of uninterrupted underwater footage. I would have liked to hear some of the surface discussions to add a more personal side.
 |
| Day 3 : Orientation dive (from Pantelleria 2005 DVD). |
Whilst writing this review, I am trying to wear two hats, firstly commenting on the footage as a diver, but also trying to critique the video as well - I do hope to one day be making documentaries of my own! During Day 3 diving, the narrator does explain how after the orientation dive the process of tagging and surveying begins - this aspect of the diving helped to bring to the audience's knowledge the magnitude of task.
For every artifact found, it is given a unique tag so that it can be surveyed along with the entire wreck.
 |
| Survey tags (from Pantelleria 2005 DVD) |
 |
| Day 4 - Scoping the wreck (from Pantelleria 2005 DVD) |
Amazingly, the wreck covered a massive 1500 m2 after laying the line which took the entire dive team a shift-pattern to cover.
 |
| Day 4 - Scoping the wreck (from Pantelleria 2005 DVD) |
 |
| Underwater life at 90m (from Pantelleria 2005 DVD). |
The interest in the expedition by the authorities is not to be underestimated, as part of the dive, the team were asked to recover a sample, not something I would normally expect on a historic wreck.

The story returns to the underwater world and even more beautiful footage is shown. The diving on the wreck is coming to a close, the objectives of the dives are now to survey the artifacts identified. I must admit, at this point I felt an admiration of the exploration divers, not only because they are competently doing 90m survey dives, but watching some of the rebreather divers hovering absolutely motionless while surveying, fins not sculling at all. That level of in-water comfort is everything a diver strives for. I must admit that I personally only feel that level of comfort after doing a solid weeks' diving when on holiday!
 |
| Day 8 - survey artefacts (from Pantelleria 2005 DVD). |
 |
| Survey of the Pantelleria wreck site (from Pantelleria 2005 DVD). |
The narrator concludes the documentary and highlights how the work at the Pantelleria wreck site is far from over and there is in fact an area of the site that highlighted that there may be many other relics to discover. There is also the middle section of the wreck and the hull, which assuming they still exist are still to be found.
Conclusion
The videography that went into this short documentary is quite literally stunning. It was incredible, there was a scene where a rebreather diver was launching their bottom stages to the surface via SMB. Whilst you could tell that they were more than just 10m from the surface, the water was so clear it looked more like a 40m dive!I think the actual production of the documentary is excellent, I highlighted earlier that I felt some scenes were far too quick and didn't allow the observer to truly grasp what they were looking at. But that is a minor point, the quality is brilliant, although there are a few spelling mistakes on the packaging and as part of the captions in the documentary - I'm still happy to overlook these. Its only because I've watched the DVD about 5 times writing this review I spotted them.
Overall I'm extremely impressed with this documentary, my only issue is the price. At £18 for just 12 minutes of actual documentary I find that quite steep. Whilst I appreciate that its supporting GUE initiatives and I'm an avid supporter, I feel that might have pushed the price too far. I would have felt better paying about £12. Paying £9.99 I think would represent very good value for money.
There is also some bonus footage showing divers surveying the wreck and also a short photo reel which is just as beautiful.
Price aside, I do recommend it and is worth a watch.
Monday, 17 March 2014
My Line Knotting Machine (mk 1)
Introduction
Ever since I did my PADI Cavern course in Florida way back in 2007, cave diving as entranced me. There were a couple things that really hooked me about it :- The exploration – I’m going somewhere that only SCUBA divers can go, and even then about 0.01% of the diving population can do it successfully and safely (for once I’m glad to be a statistic). The idea that I could be travelling and seeing things that no one has seen is fascinating
- Because of this, just the thrill of swimming along and seeing your torch light disappear ahead of you is exciting.
- Ironically, hitting your turn pressure and looking down the passage way one last time to see the passage bend and travel beyond your light makes you think “I wonder what’s down there…”
Knotting
Knotting line is actually a bit of an art, certainly not one I've perfected, but I have found some bad ways thats for sure! I’d tried in the past pulling the line of my reel and using a tape measure but that lead to a very slow process and actually wasn't that accurate. I came across a video on YouTube by Steve Bogaerts who showed his basic rig for knotting vast amounts of line very quickly.
Steve Bogaerts Line Knotting
All credit must go to Steve for my MK1 line knotting machine for its design.
Chris’s Line Knotting Machine
One thing I wanted to do differently to Steve was to knot my line every metre, whereas he was knotting every 10’, approximately 3.3m. The first important design parameter is that rather than knot his line at 10’ intervals, he actually knotted at 9’8’’ to account for tension and line stretching. This is about 3.4%. So whereas I want to knot at 1.0m intervals, I will actually be putting in a knot at about 96cm.Making the line knotting machine
The line knotting machine is extremely simple, the main body is just a length of wood. The length of this needs to be at least two-thirds, ideally three-quarters of the spacing of your line knots. For me, my knots are at 1M (effective) intervals, so my piece of wood needs to be about 66-75cm long.Bill of materials:
- 1 piece of wood (length described above)
- 2 off eyelets
- 1 off spike/carriage bolt
- Spool of line
 |
| All you need to get knotting! |
Step 1 - Insert spike
At one end, drill a hole for your spike or carriage bolt, then screw the spike/carriage bolt in place. This will hold the bobbin in place when you come to making your knotted line. |
| Pre-drill then screw in your carriage bolt/spike. |
Step 2 - Mark far eyelet
At the opposite end you will need to insert one of your eyelets. Measure a point about 1cm back from the end of the wood so to prevent splitting when you insert your eyelet. Mark the point with a biro pen.Step 3- Identify knotting point
Next has a bit of maths... So I'll do it step by step.- Decide on your distance interval between knots.
- Take off 3.4%
- Divide it by two.
- Interval = 100cm
- Remainder = 96.4cm
- Half = 48.2cm
 |
| Measure the distance carefully. |
Step 4- Pre-drill holes
Pre-drill and insert your eyelets at the first point you marked. You will want a second eyelet about 1-2 inches away from the heavy line you marked. |
| Eyelets inserted. |
Using the knotting machine
To use the knotting machine, you need to unwrap your spool and make a loop - this will be the start of your line when you are pulling it off your reel. You then want to thread it up through the first eyelet (the eyelet in the middle in the image above) through the far second eyelet (in eyelet on the right in the image above) and then back through the first eyelet (the eyelet in the middle in the image above).With the loop and knot in your right hand hold it on the line you have marked, then put a gentle bit of tension on the line with your left hand. Pinch this point with your left hand - this is where you will knot the line with a simple overhand knot.
Pull the line through so that the knot you just made is now on the marked line, repeat the process for more knots.
I've tried to explain this a bit better with my sketch below:
 |
| Running line through the knotting machine. |
Conclusion
That sums up my implementation of a line knotting machine as per Steve Bogaerts. Hopefully you will find that helpful for making your own if you are interested in cave/wreck survey and in need of knotted lines as part of your diving.
Subscribe to:
Comments (Atom)