DiveSigns

Saturday, 11 July 2015

Unboxing the GoPro Hero action camera

Everything you need to know about a GoPro Hero camera

I had bought a second-hand camera with underwater housing from a friend for the bargain price of £80. There was a problem in that it wasn't shooting video - but I thought that I might be able to address that.

A few dives later and I was finding the camera quite cumbersome, probably not helped by the fact I was taking a butter tub lid with me to use for white balance correction. I was struggling with handling it plus getting back into diving after a few years lay off - I watched my Polish friend, Olaf, with his nice compact GoPro and immediately thought that a much better idea because he could put it away in a pocket between shots. On my last holiday to Malta I had borrowed a friends GoPro and it did a great job and after diving with Olaf, I was convinced that getting a GoPro would probably help me get going with underwater and action videography better than my current camera.

And for my birthday, my fantastic girlfriend bought me the entry level GoPro called the GoPro Hero.

Whats a GoPro?

A GoPro is known as a compact action camera. The traditional camcorder of old is pretty much dead now with the rise of smart phones capable of shooting respectable amateur photography and videography. So technology came about to meet the needs of the more sporty end of videography. Cue the GoPro. Action cameras are designed to be very small and lightweight as well as being fairly rugged. It wasn't until about 2014 that other manufacturers caught up with the surge in demand. The most notable being the Sony ActionCam using very respectable Zeiss lenses.

You don't have to worry about your DSLR and expensive lenses getting wet or damaged when you have a GoPro, designed to be exceptionally rugged through simplicity, it takes Point and Shoot to a whole new level.

Unboxing

The GoPro Hero comes in a lovely white card box with a nice cut-out so that you can see the camera in its waterproof housing and start to appreciate just how small it truly is! The front is quite plain with just a few photographs, the model name and a small note stating that its waterproof to 40m (131 feet).

GoPro Hero packaging - Front
The left hand side of the box has three sections of information about the features, video shooting options and photo shooting options. These are :
  • Features:
    • Superview - performs stretching of the image at the edges to fill a 16:9 screen
    • Auto Low Light
  • Video
    • 1080p at 30 and 25 fps
    • 720p at 60 and 50 fps
    • 720p Superview at 60 and 50 fps
  • Photo
    • Resolution: 5MP
    • Burst photo: 5MP @ 5fps
    • Time lapse: 0.5 second interval
Lefthand side of package

On the righthand side we see a list with drawings of what is included in the pack. Besides the camera there is a refreshing list of extras. The total list is:
  • Integrated camera and housing
  • Built-in battery
  • Skeleton backdoor
  • Quick Release buckle
  • Flat adhesive mount
  • Curved adhesive mount
  • USB cable
You are also advised about requiring a microSD card. 

Righthand side of package

Finally on the back there is a large schematic showing some of the key features, or rather selling points such as the depth rating on the housing, wide angle lens etc.

Back
After being teased about how awesome a GoPro is, it's time to get at it! The front cover turns out to be a sleeve which can just slide off after the sticky plastic badges on either side are cut.

Sleeve removed from package
Still no closer to get at it! The packaging is sealed once again on the back at the top with the plastic hangers to allow display on walls. Cutting through this allows you to get the front and back packaging apart. Both parts of the packaging are made from good cardboard.

Now we get a glimpse of what is included in the packaging. At the top we can see the GoPro Hero camera held under a plastic shield, at the bottom is some paperwork.

The first small pamphlet (top left in the image below) is about Getting Started with your GoPro. This is not a quick start user manual. The manual comes in six (6) languages (including English, French, German) There are four basic points that it recommends that you do:

  1. Sign up for a GoPro account - Submit your most epic photos and videos for the chance to become GoPro famous (optional)
  2. Get the GoPro app (optionl)
  3. Download GoPro software - easily import, view and edit your content. Create gorgeous, GoPro-style videos. (highly recommended)
  4. Update your camera - get the newest features and best performance from your GoPro by keeping it up to date with the latest software

The GoPro Studio software is an all encompassing editor and camera management toolset. It's a rather hefty 115 Mb download - you don't need an account to get the software and it also allows you to update your camera as well.

The next document is the Quick Start Guide (bottom left in the image below). The Quick Start Guide shows how to use the camera and provides some advice on using your camera.

The third document is the Important Product and Safety Information Guide (bottom right in the image below).

Finally three GoPro stickers are included. I like these kind of things, I've got a Stormcase for my HID light which I use as a sticking ground for stickers from suppliers!
The paperwork
With the paper out the way, we can now remove the plastic shield holding back the camera. Removing the cardboard interior packaging also reveals some of the accessories. These are:
  • USB lead
  • Skeleton backdoor
  • Curved adhesive mount
  • Flat adhesive mount
The skeleton door is used to allow you to have access to the USB port with a wire, allowing better audio recording and charging while recording when connected to a PC. This could be useful if shooting lots of static / slow moving subjects in an interview type setting, especially in a hot environment.

The two adhesive mounts will be discussed further below.

Camera and accessories
Below are the two adhesive mounts; on the left is the curved mount and on the right is the flat mount. Below that is a device which is used to prevent the GoPro Quick Release potentially coming free during a high vibration environment.

Adhesive mounts and security bracket

Now we get to the good bit, the bit we are really interested in - the GoPro Hero camera. The GoPro (including the case) has dimensions of just TBD mm x TBD mm x TBD mm (width by height by depth) and weighs just TBD g.

To put this into context, I've photographed the GoPro Hero next to my Samsung S3 smart phone and a £2 coin.


Relative size of the GoPro Hero

The GoPro Hero camera and the housing are fully integrated - you can't remove the camera from the housing. Nor can you remove the battery, charging the battery is done via the USB lead.

Opening the housing

To get at the camera you open the back door. GoPro have come up with a brilliantly simple, yet absolutely secure system using a pivoting latch on the top of the camera. 

The GoPro comes with some charge, but a full charge is the first thing you will need to do, so get it plugged into your PC and charging up. Also you need to get a microSD card inserted. You don't need to worry about formatting it first - the camera will do that for you.

Connecting to the PC

When connecting the GoPro Hero to your PC for the first time you will find that Windows just treats the camera as external storage and so just works straight off. A really cool "feature" for me is that the camera shows up in my devices with the image of the Hero as well. 

Geeky feature

Connecting to the GoPro by double-clicking it in the Device menu gives you a selection of options to either view your media, copy it across, or get the GoPro software suite (which will then do all of this for you).

Hero Control Panel
After installing the GoPro software suite and re-connecting the camera you will probably be given the option to update the firmware on the GoPro.
Firmware Update


Real world testing

So I've shown you all about the GoPro Hero, its packaging and contents as well as some features, but how good is it? 

Underwater

The first thing I had to do with my GoPro before I took it diving was to find some way of securing it during dives, so all I did was attach a boltsnap. This would allow me to clip it off while entering and exiting the water and any times where I didn't want to film.

Diving with the GoPro is great, without taking any measurements it probably slightly negatively buoyant which means it stays in your hands and not want to float off. Even with thick wet gloves (5-7mm) that I was wearing, operating the GoPro was easy, because the two buttons are large and positively respond when pressed (I also had the button press noise on as well). The only annoyance was that I wanted to switch between taking video and pictures which because of the linear cycle through the menus mean't that I would have to go through all the different modes before I got back to Video (or Photo), it just meant a lot of pressing

In practice, I found that there is definitely a delay in the image capture. When you press the shutter button (top) to take a photo graph. The red LED on the back will flash three times. I think its only once its finished flashing has the photo actually been recorded. In my mind, pressing the shutter button means the image is captured upon release, once I'd taken the picture (releasing the shutter button - its now started its saving process) I would move on. This led to a lot of blurry images, with only the occasional still image.

Blurry images are easily achieved

Reviewing the video as well, I learned that the GoPro Hero REALLY like having the light, it makes a considerable difference to the quality of the images I found, this is probably due to noise in the camera. The following images were taken at the same depth, one after the other.

Looking horizontal at a depth of approximately 11m

Looking up from a depth of approximately 11m

In the latter image, whilst the foreground isn't particularly well exposed (compared to the former) there is a much better feel in terms of depth in the image. By that I mean I feel like I can't see much past the diver in the second image whereas the first image I get the impression that I can see much closer to the surface.

Another aspect of the camera liking light - when not VERY shallow or under virtually direct and intense illumination the colours become very washed out very quickly (as a diver I completely understand this, but I'm still very very surprised at how quickly the wash-out is occurring - these photos are less than 6m under water)

Underwater selfie, colours look good - you can see the blue of my mask and fin reflection well, even the yellow of my backup regulator is clear) - depth approximately 3-4m max
Downward looking photograph - same location, perhaps 4-5m max

On land / the surface

One thing that strikes you with the GoPro when taking photographs is the massive lens distortion

Massive lens distortion
In some ways the lens distortion can be really creative and quite desirable. It's not really a problem, most image editing programs provide functionality to allow you to fix this.
Not so major lens distortion.

Conclusion

The GoPro Hero camera comes with no internal memory so buying a microSD card is absolutely mandatory. For shooting Full HD video at 30 fps, a full class 10 card is recommended. All of the video and photos I took to make this blog up was taken on a very cheap Class 4. Perhaps using a Class 10 would have improve the photo taking process and reduced the number of blurry photos?

For the size (matchbox) and price (under £100), I am more than impresed with my GoPro and want to thank my amazing Charlotte for a wonderful present!

Saturday, 4 July 2015

Dive Report : Molle, Sweden

Background

As part of a birthday present by my girlfriend which was to take me to Sweden for my birthday, i also got to go diving for a day. The holiday was fire just under a week and we had some great experiences, you can read more about it in her very detailed blog here. 

Diving Day

The day started at 7am, slowly for me - not just because I am naturally rubbish in the morning but because between the high pitched, vocal seagulls and a group of Swedes coming home very drunk and had parked themselves on the benches outside our flat and were keen to make sure that all of Angelholm knew.

Breakfast was much like the previous day : meats, yoghurt and cheese. And coffee!

We left for Mölle at about 845 and we arrived at Kullyn Dyk dive centre by about 915. I met Lasse, a very friendly gentleman, and we quickly got a full set of equipment ready for me. I even got a brand new wet suit!!

It did feel very strange getting a BCD Jacket rather than a harness and wing, although Lasse did mention he had one, a Halcyon one too (!), I kindly refused because of the time it would take to get the harness how I like it.

A short drive down the road to the Mölle harbour where we found the boat.

Gear at the harbour.
It didn't take long to get loaded up and the rig built, and then I wanted to start getting into the wetsuit on because I was worried about the size. It did take about 15-20 minutes of stretching, pulling and grunting but it was on. I had to jump in and cool off after all that though! After a gentle float to cool off, we took off and I got to know my guide, an instructor called Ingrid.

Time to cool off!
The ride was only about 20-30 minutes and the water was like a mill pond!!

Silky smooth water!
We arrived at the dive site, a place known as Paradise Harbour, so named because historically, captains would bring their ships into this harbour to shield them from bad thunderstorms.

Before kitting up I looked over the edge of the boat to splash some water on me to keep me cool while I kit up, below me I can see the reef. Looking good!!

Getting into our rigs we entered the water using a backward roll off the boat, this is without a doubt the first time I've ever used this technique since PADI Open Water course!

About to jump in!
Entering the water was a welcome relief from the heat. Having not dove in a wetsuit with single tank for years I had no idea about weighting. Lasse had made a weight belt up with 9 kg for me, but I was paranoid, so put an extra 16 pounds in the jacket pocket! I knew about 30 seconds after I started swimming I was way Way overweighted!

Dive Narration

Nervous about my weighting I left my BCD inflator alone while I dropped down into the reef. We were moored on a pebbly area and surrounded by a kelp-like forest. Looking up I see the boat and the sun shining beautifully shimmering slightly through the rippling water. GoPro out ... On .. Video recording on!

Kelp-like forest
At this point Ingra led us through the underwater forest for nearly 50 minutes, for the most part I was grinning with a smile the whole time. The water was lovely and warm and the visibility was fantastic. The environment felt like I was diving in am aquarium! There were quite a few jellyfish floating about and lots of starfish which ranged in size from tiny to the size of dinner plates!

I'm glad I had my GoPro because writing this blog because I can't remember much about the dive!

At the end of the dive I was down to about 50 bar so decided that this would be a perfect time for a weight check. Just passed the anchor was a pebbled area that I could kneel down on (the shame!).
Dumping all of the air from the BCD I landed on the seabed. My BCD had quick release pockets, each one had an eight pound lead block in, pulling one out I put it on the ground, still holding on I tentatively let go .... Still on the seabed .... Big breath in .... Still on the seabed ...
Now let's see what happens with the second pocket ... Pull it out (the pocket! You dirty minded sod!) and I'm still there! This is great, it will mean I can leave all that lead on the boat and it will make the second dive so much easier!

Surface interval

We elected for a one hour surface interval and diving the same site, although Ingrid and I would be diving the southern edge of the reef this time. After getting out of the rig, and swapping cylinders, I jumped back in to do some snorkeling around the area of our first dive to take some more footage. I paddled around for about 20 minutes like this until I came back to the boat to prepare for dive #2.

Dive #2 narrative

In much the same way as dive #1, Ingrid led and it was very much a blur. Thankfully I could remind myself by watching the video footage back again.
One of my favourite pictures!

Return

The cruise back was gentle and pleasurable, Ingrid and I chatted some more while we took apart our equipment and sun bathed. Just as we arrived at the harbour, I spotted Charlotte and Marcus sitting under a small lighthouse.


A quick boat unload to return to the dive centre to pack away equipment. For 950 Kr, just £72, I got full equipment rental (wetsuit, mask, fins, gloves, two cylinders of air and boat fee) for two lovely dives.


Paradise Harbour, Molle, Sweden from Chris Armstrong on Vimeo.

Thursday, 18 June 2015

Stoney Cove two-day dive trip

My buddy, Rob, and I have a Malta diving holiday planned where we will be diving at the T1 (GUE Tech 1) level. For about the last three or four years I've basically done no regular diving, little bursts every now and then but that's about it.

Given that we would be doing T1 dives, I wanted to make sure I was ready for it. Rob would be fine, he achieved dive-god status a long time ago! It's also been about 4 years since Rob and I were last together so we thrashed out an idea to meet up at Stoney Cove, Leicestershire for a few days with our other T1 buddy, Mark, to get some diving in to practice skills.

Tuesday

Rob and Mark were travelling from London just 100 miles away from Stoney Cove. I on the other hand was coming 400 miles from Edinburgh, so at 3 pm when my core hours were done I hit the road hard and fast!


The drive was fairly uneventful, I had A Song of Ice and Fire by George RR Martin audio book (the original story for Game of Thrones) to help pass the time. I stopped at Leyland, Preston to see by Brother- and Sister-in-law after four hours of driving.

Hitting the road again I was hit by a twang of nostalgia on the M1 as I saw signs for Loughborough. I stopped at the Harvester restaurant for an evening meal (the same restaurant that my family and I had a meal at the day I moved into university).

After a quick dinner and seeing all the young 18-24 year old students I made a move to cover the last 20 miles to the B&B - arriving at just before 10 pm. We were staying at Willowmead Bed and Breakfast (link). A quick shower and it was bed time.

Wednesday

Being awoken at 5am because the sun was streaming in was painful, but rather than pull the curtains closer, I decided to do the childish thing of rolling over and cuddling the duvet to block the light! And so I got a few more precious hours of sleep until 7 am.

At 730 I opened my bedroom door with bleary eyes only to be pulled by my nostrils by long tendrils of the beautiful ascent of fresh food wafting it's way though the house! Descending into the dining room a bowl of wheatabix was consumed before demolishing a lovely fried breakfast of sausage, baked beans, hash brown, scrambled egg and black pudding! All washed down with a cafetiere of fresh coffee (what a lovely treat compared to instant!). I met an interesting man whom was an archaeologist and we had a good talk over coffee and fried food.

At 830 it was off to the Cove. For those that haven't been to Stoney Cove, the outer gates are usually open, and a road leads down to the Inner Sanctum! I was pleasantly surprised to see that I was car #3 in the queue. This is pleasantly surprising because I've used Stoney Cove as a training venue during my BSAC training at weekends - which can be quite unpleasant because of the sheer number of divers that use the site. But that is not today!

Stoney Cove do offer a loyalty / accelerating system called Diver Log. Using this system means that you don't have to fill in the paper form for each trip. Registering costs £30 but saves you £3 off the entry fee on reach visit. So if you plan on being at the dive centre more than 10 times a year then it's worth getting. You normally pay in cash on the gate to get in, but I often go to the shop and pay on my card. If you are going to be diving over several days, keep the barcoded part of your form, they can scan that to save you the hassle of filling in another the next day.

Parking in the lower car park, the one nearest the water is a pleasant treat and the fight for the good spots begins! Whilst it's tempting to drive straight towards the spots closest to the water, I always hold back a little to park in the spaces that have either a wall on the concrete fence posts at UK that I can use them to get into my rig from a good height.


Starting the epic unload from the car, Mark arrives at about 9am in Eleanor, his Elgrand luxury MPV.


Rob is currently delayed and is somewhere on the M1, to pass the time while we wait, Mark and I unpack and get our gear ready. The weather is overcast but pleasant and before long Rob arrives. Manly hugs are made and we discuss the plan for dive one. During kit up Rob realises there is a problem with his light. Whilst I couldn't find the exact problem to fix it, the problem is with the connection in the robotic cord as in enters the canister lid. Rob, now furious has to dive without a canister light. Just as we start getting in our dry suits, the sun comes out and attempts to fry us.

Dive #1

From the main quay, we descend into about 4m and get settled. Mark turns on his light, no doubt about that, Rob looks sheepish without a light, I pray that my light behaves and with a flick of the switch, I turn to look into the light head and I see that beautiful blue flicker of the arc warning up inside the HID bulb!

Staying on the 6m shelf, Mark leads at a nice casual pace, I put Rob in #2 (technically he should have gone #1 because he didn't have a light, but we were so shallow that our main lights were pretty useless and only good for long range when the bulb was pointed directly at another person to see you) and I go #3 we turn east to head towards the nautilus submarine and to head under the pub.
Moving past here we come across the very small block house, when we came out of the block house there is a small section of foundations where we found a pike.

Continuing onwards Mark leads us to the edge of the 6m shelf and over the edge which takes us all the way down to 21m. The thermocline is at about 15m and is quite considerable! From 12-14 °C at 6m it dropped to about 8 °C at 21m so lots of gas was getting pumped into the suit on the descent! At this point were are about 20 minutes into the dive with an average depth of 6m.

At the bottom we headed roughly south west to find one of the new boats sunk at Stoney Cove. The cockpit roof is removed and there is a hole into the storage areas underneath with a swim through towards the bow. I could see the light from Mark ahead so I knew he could see me coming, but then I see his fins as he has started to drop feet first into the hold. Seeing this I turn back and come out to see Rob hovering. I tell him that there is a clear swim through so he follows after Mark.

Mark above the boat

After a few minutes of swimming around this boat and we head off to the Stanegarth. Undoubtedly Stoney Coves best attraction, it's a large tug sitting up right with the deck at about 19m and the propeller at about 21m.

After swimming through the wreck a few times we leave the wreck from the stern following the anchor chain. At about this time Rob had checked his SPG  but because he was wearing his kevlar dry gloves he couldn't reattach it. He called me in and I did it for him and we then swam like mad to catch up with Mark. Because I was #3 I had been out of light range to get his attention! Oops!

We then hit the Wessex helicopter, now looking considerably worse for wear compared to the first time I saw it 8 years ago! Swimming through that and following the wall we came across a transit van.

Continuing along we came across a wall that is near the block house where we did a gentle ascent. At this point we were at about 40 minutes bottom time with an average depth of about 18m (although I thought our average depth was more like 21 so was starting to think I was hitting deco because I was on air) so the ascent up the wall was stopped every 3m as safety stop until we arrived at the 6m shelf.
Heading back along the shelf towards the exit, Rob suddenly swam out ahead and turned around to face me, that's odd, why's he doing that .... Oh crap he's out of air! I donated my long hose to him and went to my back up. Skills were pretty rusty but I managed it correctly with the exception of the routing of the hose compared to the team positioning.

Resetting ourselves after a short swim we made our way to the exit and ascended.

Total runtime : 58 minutes

Interval

During the dive i could feel wetness on my front, it wasn't until i got out i realised the true situation. I'm wet ... Very wet. The day had turned beautiful so I doff the suit and get out of my under suit and leave them in the sun to dry.

Drysuit my arse!
Dive #2
For this dive I was leading and also carrying my Al80 stage. The plan was that I would breathe down the stage then switch to back gas to finish the dive if needed.

Jumping in from the quay we headed west this time descending to the cockpit in 6m. With a twinset and stage there was no chance of being able to get right into the cockpit so I was limited to a straight swim through. Following the quarry road we descended to 21m before turning left to follow the wall along. It was at this point I was reminded about how much drag a stage adds to swimming.

Swimming along this wall we passed over the block foundations of a house, swimming along here was fairly dull, I found a broken up land rover that we did a lap around, it gave me the opportunity to just check on the guys behind me properly before continuing along the wall a bit further until we got the Wessex again.

Swimming just past it we found the wall that we dropped off on the previous dive and it was here Rob launched an SMB and we ascended gradually up the wall feeling the warm embrace as we passed through the thermocline.

Descending the wall

Swimming along the 6m shelf along the edge, Rob came to me and told me to go out of gas (OOG) to Mark from the right hand side, while he goes to the left. Catching up to Mark I was a little unfair by going OOG from his side not from the front but he took it well.

Total runtime : 47 minutes

Interval

Rob was feeling pretty tired after his late night and early start so decided to take a power nap for an hour or so, while Mark and I had a laugh.


During the interval I spent about two hours dealing with the fillers at the gas station trying to get my stage and twinset filled - came away pretty annoyed due to them a) forgetting to fill the twinset with nitrox (filled the stage though) b) then filling the twinset with air not nitrox c) getting pushed to the back of the nitrox fill queue when they finally realised they had cocked up.

Dive #3

This was intended to be a night dive but in the height of summer it wasn't going to get dark until about 10pm.

We ended up doing a surface swim all the way out to the Stanegarth buoy and then dropping straight down onto the Tug. At about 12m the light really started to drop to make it for a pleasantly dark dive at depth - the lights became more prominent.

We did two laps around the Stanegarth, then some swims throughs, on the deck, Mark and I found some kind of clamp, it appeared to not be rusted solid, so we tried seeing if it moved, it did and then we dropped it! It made a horrific bang that resonated throughout the Stanegarth! I do hope no one was inside otherwise they would be truly freaked out by now ...


Leaving the Stanegarth we headed back towards the Wessex and ascended up the wall again.

Total runtime : 47 minutes

That evening, we retired back to the B&B, had a quick wash (well I did because I was soaking!) and went out to a local indian which was fantastic.

Thursday

Staying up til about 1am after a long day of diving meant we were all suffering the next day. We head a lay-in till about 9am and had a wonderful fry up by Barbara once again. Then off to Stoney for Day 2. By the time we had kitted up it was nearly 11am already!

Dive #4

We agreed that we should probably take skills a little more seriously so when we dropped down we swam over to a platform and positioned ourselves in the infamous triangle where we would perform a V-Drill, S-Drill and Basic 5 each. Our skills were definitely rusty, but do able because it took us over 20 minutes for the three of us! On any GUE course you have to rattle these out before the start of every dive (except Basic 5) and normally the team can do this is under 10 minutes. 

Run time : 50 minutes


Dive #5

The final dive was based on my suggestion. As part of some practice for the dive trip I wanted to have a go with two stages (a bottom stage plus deco bottle), I then wanted to ramp the challenge up one more notch ... the profile didn't require it, but I would treat the two stages as though they are 6 and 21m deco bottles and do switches at the correct depth.

Getting in the water I remembered the previous dive where I found the stage was adding massive amounts of drag, adding a second seemed to amplify the effect a 100x! I was kicking but it felt like I drifted an inch forward and stopped, so I was kicking constantly. Afterwards, Mark said I had absolutely shot down the road so it must have been a perception thing.

The plan was that I would lead the team, Rob as #2 with Mark at the back in #3, past the cockpit and down the slip-road to the hydro-box at 35m. We would then veer off the road and get away from the wall so that we can do a blind ascent i.e. no visual references other than each other.

The swim down was very hard work, I thought I wasn't making any progress. At 33m I veered off the road to the left to get us away from the wall. I started pumping gas into just my wing at this point to get myself neutral as I had been unaware that my hard work was caused by me being far to negative (therefore finning to try and keep up). Getting neutral was a nice relief. 

Thumbs up all around, time to head up! Gas in the wing to get the ascent going at a decent speed. The metres are ticking by now... 32, 30, 27, 25 ... signal to start slowing the team down... and we come to a gentle stop at 21m.

I went to signal to Rob to start putting up the bag, he was already doing it. It was at this point I started having my first problem, I couldn't get both Rob and Mark in my field of view simultaneously and it was stressing me a lot, I couldn't even find Mark, he was obviously about somewhere ... It took about 15 minutes for me to resolve that I would just focus on Rob.

Once Rob had the bag sorted, I started the procedure for switching to 50% (21m bottle). I looked down at the stages and I couldn't read my bottle properly so I wasn't a 100% sure which one to go to. I took the one I thought it was and proceeded with the switch. The final step is that you present the reg and bottle to your team, one is marked up for 21m, the other is clearly marked for 6m and full of oxygen. You don't want to make this mistake which is why we have our team involved in the switching process - I looked at Rob and he confirmed the switch. I was switching to the right bottle after all. 

I was deco captain so I looked at my bottom timer, we did 5 minutes at 21m and then moved up to 18m for 1 minute. My timer doesn't record in seconds, a massive drawback with the Uwatec, so basically I had to guess how far through a minute we are.  Talking with Mark after, who had a timer that could display seconds, I was roughly 30 seconds quick to instruct the move. 30 seconds doesn't sound too bad, but our deco strategy requires precise timing so could cause problems later.

The ascent was flying by until we arrived at 9m. I was probably loading my lungs a bit to keep up with the ascent which was why I was feeling stressed. At 9m I told the team I was switching off my 21m bottle and back onto backgas (the twinset). Upto 6m .... And I bottled it ...

I didn't want to switch to oxygen. I felt like my buoyancy wasn't good enough and that I didn't want to be on o2 and then drop too much. I told the team that I didn't feel good (wavy hand,) I then said I (pointed at my self) no (waving my hand like an angry parent) switch (switch gesture) to my deco bottle (pointed to deco bottle with o2).

We continued the ascent on plan, 5 at 6, 1 at 5, 1 at 4, 1 at 3, 1 at 2 and 1 at 1 followed by a short ascent to the surface.

Breakdown

Five lovely dives after arriving it was time to start breaking up our gear to head to our respective homes. The weather at this point turned beautiful so undersuits (i.e. mine!) were left in the sun to dry while we went to Nemo's Bar (Stoney Cove's own pub) to enjoy dinner and the post-dive beer.


Team Photo

Sunday, 1 March 2015

A-frames, Loch Long, Day Trip

Getting wet again

So it's been a very long time since I was last in the water, so long in fact that not only have my tins gone out of test, they've gone out of the second test too!!

As part of my return to water, I'm doing some nice easy single tank only dives with some friends from work. On Friday I did a dive at a local puddle in Inverkeithing. I had been quite nervous about it because I imagined that I would be flailing about, unable to sink and generally suffer a complete loss and fabulousness.

Thankfully that wasn't the case, I was surprisingly comfortable, especially after the first 20 minutes where I started to relax. The result of this is a trip over to the west coast in the salty-stuff! The plan had been to go to St Abbs this weekend, but the forecast was looking grim, Loch Long was Plan B.

Going to the westside

At 630 am the alarm was going off. My lovely girlfriend has made me cinnamon pancakes for breakfast which I inhale. The car is loaded with surprisingly little gear (because I'm borrowing cylinders and I'm not using the twinset) and I head off to Uphall to meet Tam and Mark. A very fun game, which I had forgotten all about since upgrading to a Mondeo estate, of 3D-tetris ensued. 

Amazingly 6 cylinders, 5 dive bags and three people got into a fiesta and we were off on the road for 830. The poor car did struggle on the hills though but we made it!

Both dives were identical, so rather than describe each one, I'll provide a general narrative that adequately describes both.


Dive 1
In: 240 out: 90
RT: 40
Dive 2
In: 160 out: 50
RT: 30

There isn't really steps down to the water front, it's more of a scrabble across a rocky path. It's easily do able, but I recommend taking your rig down, then your weights and then you go down when in your dry suit. It just means you are less likely to slip.

I had my brand new Santi BZ400 custom undersuit on so I was pretty bound up, between that and the weight belt (which I've never used before because normally I'm in a twinset) so it was a struggle but fins got on eventually - it's amazing how much finesse you lose when you don't dive regularly. I remember kitting up being a breeze. I remember on my trimix course having stages and even that wasn't really a problem, and here's me struggling whilst wearing a single 12!

Once in the water, the visibility at the surface was probably the best at maybe three to four metres.
Once the team was settled, we swam off. When swimming across the sea bed, I'd say it's sparse with life. There was the occasional crab but that's about it. After swimming about a bit we found a concrete pillar laying on the sea bed. These are your reference points to find what are called the a-frames.

The a-frames are a pair of concrete structures. Approximately triangular, stood up right spaced about 1m apart. We were at the 15m a-frames, there are more at about 25m where the visibility is said to be better. But because I certainly hadn't been in the water for a few years really, I didn't want to go deeper.

The a-frames are absolutely covered in life. I defocussed my HID light from the tight, light-sabre-type, beam to provide a wider beam for lighting the area up more.

In my mind I always imagined Scottish waters to be murky and the animal life to be muted colours like yellows and browns, but in reality there were many more vibrant colours, typically purple and pinks. I was very much surprised!

We would do two or three laps of the a-frames which usually meant we were at about 100 bar (the needle drops disgustingly quick on a single!!) before heading back the way we came to head back to the surface. Each dive was about 35 minutes long.

We were lucky that the weather was nice enough during the surface interval and post dive to allow us to breakdown our equipment and be dry.

I thoroughly enjoyed my dives at the a-frames and would definitely go back again, although I'd make sure to go when it hasn't been raining within the previous few days as that did noticeably cripple the visibility.

On the day a tanker was docked at the nearby terminal, I am guilty of wishing it would sink, that would make a fantastic dive! For those who have been to Malta, said tanker was at least the same size as the Um El Faroud! Generally a very good day out, thanks to Tam for driving and Mark for sourcing the extra cylinders!

Thursday, 25 December 2014

Merry Christmas 2014

I've not been very active for the last half of the year, I've been busy with university commitments in the evenings and work during the day means one does not get much free time to do fun stuff like diving!

Despite all this, I wish everyone a very Merry Christmas and all the best for a fantastic 2015!

Sunday, 10 August 2014

Equipment Review : Spring Straps

Introduction

In my opinion, if there is a single piece of equipment that makes kitting up easier then spring straps have to be either at the top of, or near the top of the list. A brilliantly helpful buddy is also there too. Some people just seem to have a better capacity and are able to sort themselves out AND assist others at the same time.

I am going to discuss two slightly different spring straps as part of this review. My point with this review is to review spring straps as an object as opposed to a brand specific review, but you will also be getting that as a spin off (but like I said its not the primary focus to compare and contrast).

Spring What?

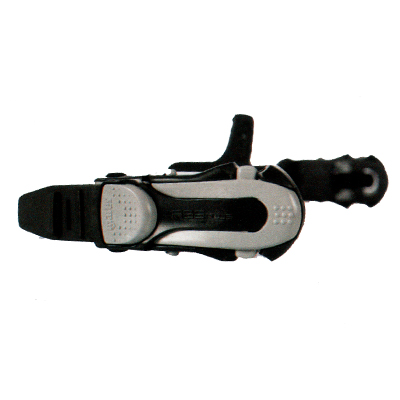
Spring straps, they are simply straps (for your fins) that are made of springs. And that is it - they are simple and fuss free. To explain better, I think its better to show the "competition":

Rubber Fin Straps

The fundamental part of the traditional fin strap is the rubber fin strap itself. A typical one is shown below:
Traditional rubber fin strap
First of all, the name is an issue. The VAST majority of the fin straps are not made from rubber-based compounds. Typically they will be plastic. The problem with this? Rubber is made from very long molecule chains of hydro-carbon polymers. This is what gives rubber its texture and stretchy properties.

Plastic is also made from hydrocarbon polymers however, these tend to be shorter and more of a network. This means that while the individual bonds are still able to stretch in the same way as rubber, the overall magnitude of the stretch is less. This on its own isn't a massive issue : a slightly less stretchy material isn't too problematic.

The issue is that plastics become brittle with decreasing temperature. Whilst you are hardly diving in liquid helium at nearly Absolute Zero, British and Northern divers WILL be diving in water easily approaching 2-3oC. At these temperatures, hydrocarbon polymers because less elastic. In the short term this simply means less stretchy. The other issue is that it reduces the force required to cause plastic (i.e. permanent) deformation. So what does THIS mean? It means that with time the plastic strap will become significantly more fatigued and more likely to fail, i.e. snap. And when will it do it? At the point it is under the most loading i.e. when you are trying to stretch it over your feet just as you are about to jump in.

Buckles

Plastic buckles suffer from the same materialistic issues as the straps explained above, but I don't think that this actually their biggest problem. The buckles have been designed with the assumption that all divers are in the Maldives.

What I mean by this is that they are very fiddly, using them whilst wearing gloves is hard work, and when your hands are cold and wet I find that the buckles are actually painful to use.

I see many divers struggling with the strap and buckle system, most struggle in different ways, but its still a struggle to get that little fiddly bit of plastic slotted in the socket and pull the strap tight.
Plastic buckles

And the alternatives?

Having looked at traditional "rubber" straps and their buckles, I personally am of the view that they are not a great choice, so what's our alternative? Well permanently riding a scooter is an option, certainly one I'd love, but the Bank of Santander says no.

In practice the other option is spring straps. A spring strap is quite literally a stainless steel spring with a nickel cord (sometimes) that we are using as a strap. The spring is rated such that there is no way we are going to break it by stretching it. Its stainless steel so that it wont rust. And with the rating being so high that even with the cold water we still can't break it this means its a solid ultra-reliable and ultra SIMPLE solution.

Simple spring strap (from www.oms-russia.ru)
Whilst researching this article, I came across spring straps with clips. I thought that this is defying the point. You've got the ultra-reliable spring, but then you have the cheap plastic buckles which are fiddly (my issue with buckles) but made of plastic (can break easily) - so whats the point?
Buckled spring straps (from bluewatersports.com)
So that is something I would not recommend. An absolutely simple spring strap that attaches to the rubber of your fins is that you need.

The XS Scuba ones that I recommend (for Jet Fins and Jet Fin variants like Turtle fins, Hollis F1 etc) attach by going through the mounting point of the old rubber fins. So these are not going anywhere once attached. Although I do also have the "generic fin straps" that I've provided a link for below on one pair of fins (my "summer non-drysuit fins")

Whilst research the XS Scuba straps, I also found that they now come with both types of connection (the pins and the studs).

Sources

Conclusion

A good quality of spring straps will make donning and doffing fins a much easier activity and more comfortable on the fingers. Snapped straps at the last second will cause no more stress as they will be resigned to the history music alongside the diving helmet.

Sunday, 27 July 2014

Attaching boltsnaps

Background

A wide range of your gear will need bolt snaps being attached : your primary regulator, your SPG, your primary light and so on.

This article will take you through the technique of securely attaching bolt snaps to your gear easily and reliably. I always struggled understanding how to attach bolt-snaps because, being dyslexic, I do struggle to understand and learn by reading (in particular), but also listening too. I much prefer to do and be shown, so I could never do bolt snaps until someone showed me this technique.

Getting started

To attach a bolt snap to a piece of equipment you will need the following :
  1. A bolt snap
  2. Your equipment
  3. A piece of cave line approximately 20 cm long
  4. A lighter

In this example, I want to attach a bolt snap to one of my stage bottle regulators as you can see below.

Regulator and boltsnap


The first step is to wrap the cave line around your hose and through the bolt snap three times as shown below.
Three wraps around the hose and bolt snap


You want to pull both ends of the line tight to bring the bolt snap tightly against the regulator hose. Then make a reef knot as shown below. Pull the reef knot tightly to secure it and pass the two ends of the line backwards. You will probably have to pull the lines tight to get them under the boltsnap. The tighter you can do all of these steps the better secured the bolt snap will be.

Passing the lines backwards

Flip the hose over so that you are now looking at the back of the bolt snap. Pull the lines tight and make another reef knot on this side of the bolt snap as shown below.

First reef knot on the back.
Make a second reef knot on top of the previous one to secure it.

Second reef knot on the back.
Use the lighter to "cut" the cave line to length. Also burn the ends right down and use the butt of the lighter to make a mushroom top to the end of the cave line. This will prevent the line from getting pulled through the knot.

Neat bolt snap

And that's it. One bolt snap securely attached to your hose. I hope this has been of use, if you think I can make the explanation better or need additional pictures let me know and I'll update this guide.